


Price: [price_with_discount]

Product Description
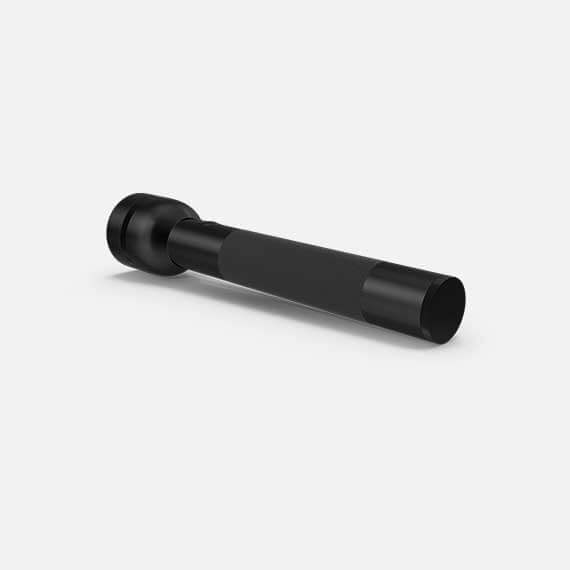
LM10 is a titanium flashlight designed and launched to celebrate the 10th anniversary of Lumintop. Made of titanium alloy, the flashlight is light-weight and super durable. The unique shape design and fantastic anniversary sailing icon imply a prosperous future of Lumintop. The flashlight applies the classic and easy to use Aduril UI, and it emits a 2800 lumens super bright output from three emitters. IPX8 waterproof protection, tritium slots, LM10 is more playable and it is the ideal choice for both daily use and collection, etc.
Features
1. Emitter: 3 Cree XP-L Hi(Cold white), Nichia 219CT(Neutral white), and Luminus SST20 LED(Neutral white)
2. Optic: Standard TIR optical lens
3. Flux: ~2800 lm (XP-L Hi)
4. Intensity: ~10 000cd ANSI throw ~200 m (XP-L Hi)
5. Firmware: Free software called Andúril
6. User interfaces:
[1] Defaulted SMOOTH RAMPING. Instant access to TURBO mode is also provided.
[2] STEPPED RAMPING UI.
[3] MOMENTARY mode.
[4] MUGGLE mode.
[5] Electronic LOCKOUT.
7. Other functions: Battery check, sunset, beacon, tactical strobe, party strobe, bike flasher, candlelight, lightning storm
8. Battery: One 18650 cell. An unprotected cell is recommended. Max. length 66mm. Cell is not included.
9. Driver: FET+7+1 driver. Low parasitic drain while OFF
10. Body:Brass
11. Switch: Electronic and Ti tail switch
12. Ingress rating: Equivalent to IPX8
13. Weight: Approximately 98 g without cells (titanium)
14. Size: 26 mm Ø head x 98 mm length.
Package included
1.1*LM10 Flashlight
2.1*User manual
3.1*Battery change note
4.1*Spare O-ring
5.1*Stainless steel clip


Safety precautions
1.Use only a reputable 18650 cells of known origin. Quality high drain cells (over 10A)unprotected, flat top type cells, The supported maximum length is 65 mm.
2.Use a reliable battery charger. Never over-charge or over-discharge cells.
3.Remove and recharge the cell when the low voltage indication is given by the Lamp (repeated step-downs in lightlevel and eventual shutdown of the light).
4.The extraordinary energy density that 18650 cells offers also means that hazardous conditions are created when a cell is short-circuited or damaged. Always treat cells with respect and properly dispose of damaged cells.
5.The LM10 is a very high-intensity flashlight. Do not point directly at a person, animal, moving vehicles or flammable materials.
6.When running at higher output levels the head of the Lamp will quickly heat. This is normal. In warmer ambient conditions this temperature may exceed 50'C depending on your settings, so please take the necessary precautions when handling the Lamp.
Quick start
1.Use a 18650 cell. Please note that the LM1O requires unprotected cells.
2.Unscrew the front half from the back half and insert the battery (The tail isn't meant to disassembled). Take care with the polarity:
Plus points toward the head.
3.Screw the head back. The LM1O blinks once to confirm it has power and is now operational. Tighten the head. Do not over-tighten.
4.When you change the battery the lamp starts always at the regulated level at ~120 lm (1×7135).
5. AlI functions are performed using the electronic tail button.And basic usage is very simple: Click for on/off, hold to change bright-
ness. Release and hold again to change brightness the other way.
6.From OFF, hold the button. The light output will ramp up from a very low level to Ceiling-Of-The-Ramp. Release the button when
the required light level is reached. (The full ramp takes about 3s.) Use a single-click at any time to turn the LM10 0FF. Please see below for further details.
7.While ramping it does subtle blinks to signal: Max regulated levels (1×7135, Nx7135) and CEILING.
8.The LM10 has two different ramps: SMOOTH RAMP and STEPPED RAMP. You can change between them when the lamp is ON with three clicks. Each ramp has its own individual settings – for floor (lowest level), ceiling (highest level).And the stepped ramp can also have a configurable number of steps.
9.TURBO is only for short times. At around 10s you may notice it dims slowly down! The user should use it only for short periods
instead of relying on thermal regulation to prevent heat damage. Full turbo is powerful enough to start fires in just a few seconds,
especially when aimed at dark-colored materials
Default Ul: Smooth ramping
This Ul provides smooth dimming of the light output between FLOOR (lowestlevel) and CEILING (highestlevel), with an easily accessible 100% TURBO mode.
Switch to STEPPED RAMP: when the lamp is ON: Three clicks (Hint: If you use 3 clicks from OFF you engage battery check)
Turn the lamp ON: single-click the button, the LM10 turns ON using the previously used light output level (MEM)
Ramp up; brighter: hold the button
Reverse ramp: while ramping in one direction, release button briefly and hold again
Ramp down; darker: Click, hold, when ON (means: double-click, but hold the second click a bit longer)
If you do this when the lamp is OFF, it ramps down from the CEILiNG (dashed double lines)
Instant top CElLING: from OFF: double-click (double lines)
TURBO: from ON: double-click toggles between turbo and the memorized level from OFF (You must first switch ON): Click, then double-click
FLOOR / MOON mode: from OFF: Hold turns on at the FLOOR level, it makes a subtle “blink" to provide a timing hint if you want to stay there. If you keep holding, it ramps upt
Battery check: from OFF: triple-click (4 blinks, a short pause, then 1 blink would indicate 4.1V)
Turn the LM10OFF: single-click
UI:Stepped ramping
Using this Ul the output does not ramp,it steps from one mode to the next using hold. The firmware tries to optimize these steps as equally-spaced on a cube-root curve (considered an ideal mode-spacing by many).
In STEPPED RAMPING you can choose how many steps you want. (See Ramp configuration for details).
All operations are the same as in smooth ramping
Switch to SMOOTH RAMP:
when the lamp is ON: Three clicks (Hint: If you use 3 clicks from OFF you engage battery check)
Ul: Momentary mode
5 clicks from OFF to enter Momentary mode To exit this mode, physically disconnect power (unscrew the light).
This mode locks the flashlight into a single-mode interface where the LEDs are only on when the button is held down. It is intended for Morse code and other signaling tasks.
Brightness is the last-ramped level, so adjust that before entering momentary mode.
Ul: Muggle mode
Muggle Mode dient dazu die LM10 an Dritte zu verleihen. Er hat eine reduzierte Leistung um sicher zu stellen, dass niemand etwas anzun-det. Ein extrem einfaches Interface mit eingeschrankter Helligkeit-~5 Im bis ~24O Im, mitlangsamen stufenlosem Ramping und ohne Blinkies. Obersteht einen Akkuwechsel.
MUGGLE mode ON: from OFF 6clicks to enter
MUGGLE mode OFF: 6 clicks to exit
One click ON/OFF and HOLD to ramp up/down.
UI: Electronic Lockout
4 clicks form OFF to disable the LM10, same to reenable the lamp. Lockout makes the light safe to carry in a pocketor a bag or anywhere else it might be pressed by accident. Lockout doubles also as a mo-mentary moonlight mode, so the user can do quick tasks without having to unlock the light.It uses the FLOOR of the current ramp.
Blinkies
Two groups worth of blinkies are included. To reach them, do “click click click" from OFF or a "click click hold" from OFF. To change to the next blinky use a double-click. These include:
Group 1 Blinkies / utility modes: (starts always at battcheck) from OFF: "click click click"
BattCheck:
Shows the remaining charge in volts and tenths.E.g.4 blinks, then pause, 1 blink are 4.1Volt.A"zero" is represented by a very quick blink.
Sunset I Goodnight mode:
Starts at a low level, then slowly dims down to moon for an hour, then shuts of. It is intended for use when going to bed.
Beacon:
Beacon mode uses the last ramped level for its brightness. You must adjust the brightness before you turn beacon on. It blinks at a slow
speed: Once every N seconds at the last-ramped level.
N is configurable in beacon config mode: Click 4 times to enter beacon config mode, wait for the light to stutter, then click to enter the number of seconds per blink. For example, to do a 10-second alpine beacon, click 10 times.
Hint: If you want faster blinks per second use party strobe mode and set it to three blinks per second or more
TempCheck:
Blinks out the current temperature in degrees C.and optionally configure settings for thermal regulation. E.g. 3blinks, then pause, 4 blink are 34 degrees Celsius. A"zero" is represented by a very quick blink. This number should be pretty close to what a real thermometer says. If not, it would be a good idea to click 4 times to enter thermal config mode, and calibrate the sensor.
Group 2 Strobes:
(remembers the last-used mode) from OFF: "click click hold" Click three times, but hold the third click for a moment. To change to the next blinky use a double-click.
To set adjustments you can use:
– Hold:Increase brightness, or strobe faster. (exceptlightning)
– Click, hold: Reduces brightness, or strobe slower. (except lightning)
Candle mode:
Simulates a flickering candle or fireplace, until you switch it OFF. Or you add timer for 30min:Each triple click adds 30 min including a burn down simulation at the end. Candle mode timer can go for up to 4.5 hour.Adjustable brightness.
Bike flasher:
Steady output with a “stutter" once per second. Designed to be more visible than a normal ramping mode, but otherwise works mostly the same. Adjustable brightness.
Party strobe:
Motion-freezing strobe. Can be used to freeze spinning fans and falling water. Adjustable speed.
Tactical strobe:
Bright, disorienting strobe light. Can be used to irritate people. Adjustable speed, and the duty cycle is always 33%.
Lightning storm mode:
Flashes at random brightness and random speed to simulate lightning strikes during a busy lightning storm. Do not look directly at the flashlight when this mode is running, because it may suddenly go to full power without warning.
General configuration
Every config mode use the same interface. Ithas one or more options the user can set, and it will go through its configuration numbers in order. The LM10 confirms each click with a blink.
For each menu item, the light will follow the same pattern:
– Blink one or more times = configuration number
To indicate which setting you are in. All config menus “fall through" with no changes if you don't press the button.
-“buzz"=The lamp waits for input
Buzz is a stutter quickly between two brightness levels for a few seconds. The User can click one or more times to enter a number. It will keep buzzing until the user stops clicking, so there is no need to hurry.
– Pause, and then go to the next option
After the light has gone through all of the menu options, it should return to whatever mode the light was in before entering the config mode.
Ramp configuration
Both the SMOOTH RAMP and the STEPPED RAMP are configurable The user can set the lowestlevel, the highestlevel, and (STEPPED only) the number of steps.
While the light is ON in one of the ramping modes, click 4 times to enter RAMP CONFIGURATION for the current ramp.
For SMOOTH RAMPING, there are 2 menu options:
1. Floor (default level=1/150;
2. Ceiling (default =130/150)
For the STEPPED RAMPING, there are 3 menu options:
1. Floor (default level =20/150)
2. Ceiling (default =130/150)
3. Number of steps (default= 7)
To configure the floor level, click the button equal to the number of ramp levels (out of 150) at which the floor should be. To set the lowest possible level, click once.(MOON)
To configure the ceiling level, each click goes one level lower. So 1 click sets the highest possible level, 2 clicks is the 2nd-highest, 3 clicks is the 3rd-highest level, etc.
Ceiling clicks: 151-(level you want)= Clicks To set the default of 130/150, click 21times.
When configuring the number of steps, the value can be anything from 2 to 150.
If you want to change the floor and ceiling to the lowest and highest values, you click once for each.
Defaults settings LM10 (lumen are form prototype 4)
 Thermal configuration
Look at a thermometer to check the current room temperature. Let us assume it says 21 Celsius.
Turn the light off and wait for its temperature to settle to room temperature.
Go to TempCheck (from OFF: "Click Click Click". Ascend with double-clicks three times)
When you are in TempCheck, then click 4 times to enter thermal config mode, and calibrate the sensor.
Thermal config mode has two settings:
1. Current temperature Calibration.Click once per degree C to calibrate the sensor. For our example, the ambient temperature is 21C=click
21times.
2. Temperature limit. This sets the maximum temperature the light can reach before it will start doing thermal regulation to keep itself from overheating. Click once per degree C above 30. For example, to set the limit to 50 C, click 20 times.The default is 45 C (15 clicks).
Hint:If you don't click, the lamp will leave the value unchanged. The lowest value the user can setis 31C, by clicking once.
Protection Features
Some features which aren't visible on the diagram:
Anduril includes low voltage protection (LVP) and thermal regulation. LVP makes the light step down to a lower level when the battery is low, and if the light is already at the lowest level, it shuts itself off.This activates at 2.8V. LVP adjustments happen suddenly, in large steps.
Thermal regulation attempts to keeps the light from overheating and otherwise adjusts output to stay as close as possible to the user- configured temperature limit. Thermal adjustments happen gradually, in steps so small they are difficult for humans to perceive. It ramps smoothly across 512 internal steps (from 1×7135 to full power) to adjust output while it searches for the highestlevel it can maintain without overheating.